Splitting an Excel File into Multiple Files
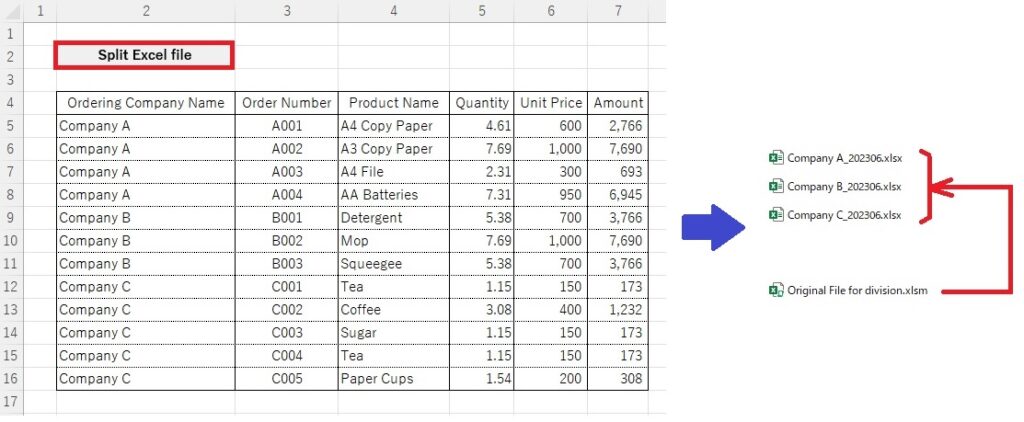
I would like to introduce a sample application that splits a table created in Excel into multiple files. The sample application I will be presenting is a VBA code that divides the file into separate files based on the company names listed in the table. This sample code can be useful in various situations, such as distributing a single file to different departments or sending files separately via email for different business partners. Please note that in this example, the data was split into files based on sorted data. If you would like to split files with randomly ordered data, please refer to the following website:
https://scodebank.com/?p=1449&lang=en
Explanation of the Method
To create the split files, you need to create a new file (workbook) and then copy the data before saving and closing the split files. The following methods are used for this process:
First, use the Add method of the Workbooks collection to create a new workbook.
After creating the new workbook, copy the data from the original file, then save the split file using “ThisWorkbook.SaveAs" followed by the file path, and finally close the file using the Close method.
 'Create a new workbook
 Set Wb2 = Workbooks.Add

    'Code for copying the data from the original file

 'Save and close the split file
 Wb2.SaveAs Filename:=FileNam 'Save in the same folder and close
 Wb2.Close
 'Release the split file's workbook
 Set Wb2 = Nothing
Explanation of the Sample Code
When you click the “Split Excel File" button, the contents of the table will be divided into separate files based on the companies.
Sample Code Here are the steps to create the app
Sub Export_ExcelFile()

   'Variable declaration
   Dim Wb2 As Workbook, FileNam As String
   Dim xPath As String
   Dim key As String
   Dim i As Integer

   Dim Sh1 As Worksheet
   Dim Sh2 As Worksheet

   'Specify the worksheet
   Set Sh1 = ThisWorkbook.Worksheets("Sheet1")

   'Specify the starting data row (5th row)
   Dim start As Long
   start = 5

   'Specify the output path
   With ActiveWorkbook
      xPath = .Path & "\" 'Specify the path from the folder where the file is located
   End With

   'Loop until the position of the empty order number
   Do While Sh1.Cells(start, 2) <> ""

      Set Wb2 = Workbooks.Add 'Create a new workbook
      Set Sh2 = Wb2.Worksheets("Sheet1") 'Specify the sheet of the new workbook

      'Get the date to be appended to the file name
      Dim strDate As String
      strDate = DateSerial(Year(Now), Month(Now), 1)
      strDate = Format(strDate, "yyyymm")

      'Export Excel file
      FileNam = xPath & Sh1.Cells(start, 2).Value & "" & strDate & ".xlsx"

      'Copy the title row to the sheet of the new workbook
      Sh1.Range(Sh1.Cells(4, 2), Sh1.Cells(4, 7)).Copy Sh2.Range("B2")

      'Specify the initial paste position in the new workbook (start from the 3rd row)
      i = 3
      'Get the first company name from the original sheet
      key = Sh1.Cells(start, 2).Value

      'Loop while the same company name continues
      Do While Sh1.Cells(start, 2).Value = key

         'Copy the data row
         Sh1.Range(Sh1.Cells(start, 2), Sh1.Cells(start, 7)).Copy Sh2.Range("B" & i)

         i = i + 1 'Shift the destination row one down.
         start = start + 1 'Shift the original company name row one down.

      Loop

      'Draw a horizontal border at the end of the exported table
      Sh2.Range("B" & i & ":" & "G" & i).Borders(xlEdgeTop).LineStyle = xlContinuous
      Sh2.Range("B" & i & ":" & "G" & i).Borders(xlEdgeTop).Weight = xlThin

      'Adjust the column width of the destination to match the data length
      Wb2.Worksheets("Sheet1").Range("B:G").Columns.AutoFit

      'Save and close the split file
      Wb2.SaveAs Filename:=FileNam 'Save and close in the same folder
      Wb2.Close

      'Release the workbook of the split file
      Set Wb2 = Nothing

   Loop

End Sub